
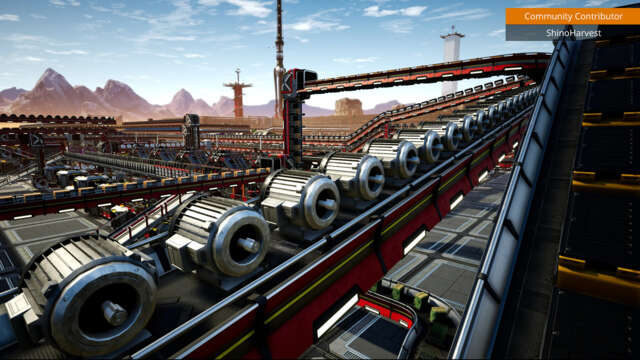
In Satisfactory, everything has a recipe. Iron Plates require Iron Ingots. Screws require Rods. Reinforced plates require Iron Plates and Screws. But in the same way that a cookie recipe will let you substitute out things like eggs and butter, Satisfactory has all kinds of alternate recipes that let you make items out of simpler recipes and more common resources. They range from being true game changers to being something you should skip. In this article, we’ll explain how to find Hard Drives and get the most out of them, and lay out some of our favorite alternate recipes, focusing especially on the early game.
How to find and use Alternate Recipes
Being inventive and creative isn’t enough to make an alternate recipe–you need cold, hard data, in the form of Hard Drives. You’ll find tons of Hard Drives around the Satisfactory map as you explore, build new sites, and connect sites together. Once you unlock Radio Signal Scanning in the Quartz research tree, you can also scan for Hard Drives using the Object Scanner.
Once you have a Hard Drive in hand, though, you can head back to your Molecular Analysis Machine and dump the drives there for safe keeping.
There are a few important things to note about using Hard Drives. Each drive will randomly select a set of alternate recipes when you research it, but the options reflect your current status in the game. In other words, you’re not going to get an alternate recipe for nuclear materials when you haven’t even unlocked oil processing. You can re-roll each drive’s alternate recipe options once, but we recommend holding off. The MAM can store multiple Hard Drives, and there’s absolutely no rush to use that new drive right away. By leaving that undesirable recipe in the MAM, you’re ensuring that next time you research a drive, you won’t get that same recipe again, as it’s kind of reserved. Rerolling it later also means you’ll be drawing from a wider variety of options more reflective of the progress you’ve made.
In other words, save those Hard Drives up until you see a recipe that fits your needs.
For a full, in-depth list of alternate recipes, the Reddit community has a great alternate recipe tier list worth consulting.
Speaking of which, here are some of our favorites from the over 100 alternate recipe options.
Cast & Steel Screws
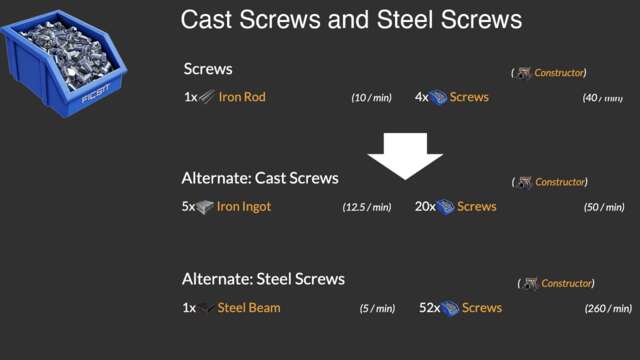
Screws are one of the most annoying components in Satisfactory’s early game. They take two steps to make–Iron Ingots to Iron rods to screws–and they don’t output at the rate you’ll want to use them at. If you can find the Cast Screw recipe early on, grab it. This lets you convert Iron Ingots directly to Screws. It uses the same resources, but it requires one less machine, which saves both space and power. Better yet, it outputs those screws 20% faster, from 40 to 50 per minute.
Later on, the Steel Screw recipe is even better. You’ll be making tons of steel beams anyway, and this recipe will allow you to convert five steel beams to 260 screws per minute.
Iron Wire

Iron Wire isn’t an inherently huge improvement over regular Copper Wire, but situationally it can be very useful. For example, the starting area in the Rocky Desert has three pure Iron nodes in a relatively short distance, but only one normal Copper node. Copper quickly becomes a crucial resource, and you’ll have plenty of Iron in a case like this. This recipe allows you to direct some of your Copper needs away from Copper until you have better miners and more Copper nodes.
Iron & Copper Alloy Ingots
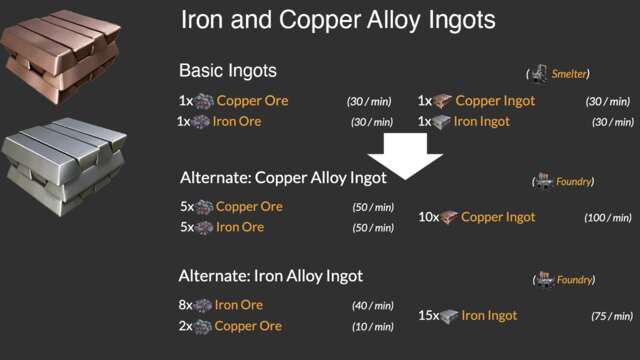
This is a peanut butter/chocolate situation–these two recipes are good on their own but pair up very well. Both of these recipes use Copper and Iron Ore, but send them directly to a foundry, which you unlock in Tier 3, to be combined into different alloys. These two recipes not only use the same ingredients, they both triple the output compared to standard Iron and Copper Ingots. Win-win.
Fused Wire & Quickwire
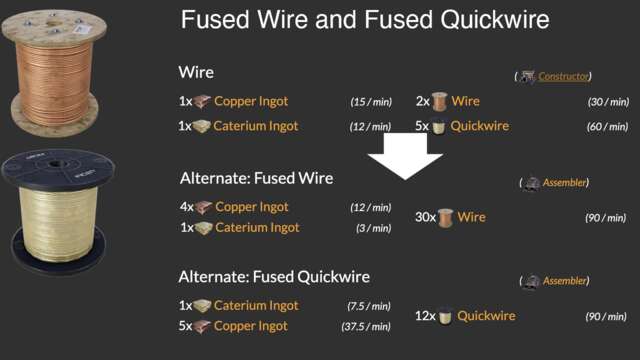
Another great recipe pairing. Both recipes use Copper and Caterium Ingots, so it’s easy to route the incoming Caterium and Copper to two machines instead of one. Fused Wire will triple your Wire output in the same amount of time without making production any more complex–you’ll use an assembler instead of a constructor–and for roughly the same power. Fused Quickwire, meanwhile, will increase your quickWire output by 50%. Overall,
Stitched & Bolted Iron Plate
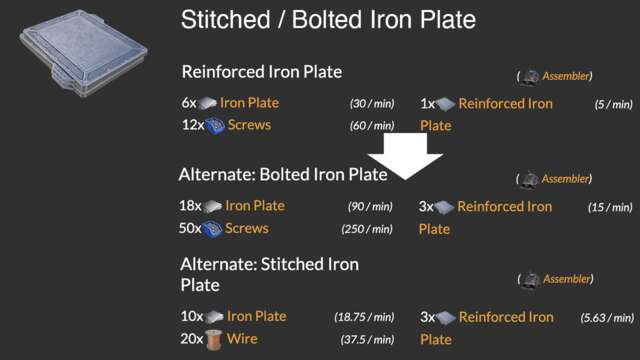
Reinforced Iron Plate is a common part that you’ll use throughout the game. If you find one of the screw recipes above, Bolted Iron Plate will allow you to triple your output with only slightly more resource input. Meanwhile, if you have an abundance of Wire, Stitched Iron Plate will use Wire instead of Screws, slightly raising your output and letting you make use of a component you’re swimming in.
Iron Pipe
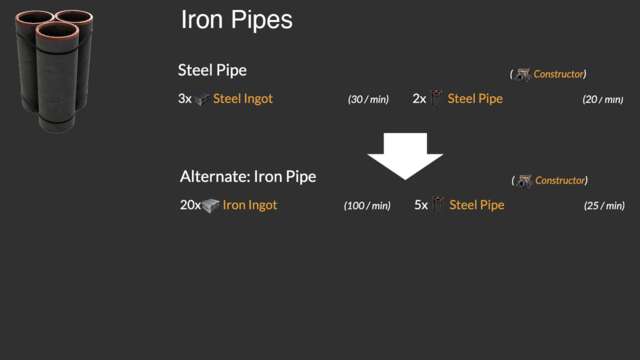
Iron Pipes aren’t a huge leap in efficiency, going from 20 steel pipes per minute to 25 Iron pipes. But what’s important here is the ingredient change. Steel Ingots, just like Iron, end up going into lots of different components once you get going, and Iron pipes give you the option to shift to something you might have an excess of–Iron Ingots.
Copper & Steel Rotors
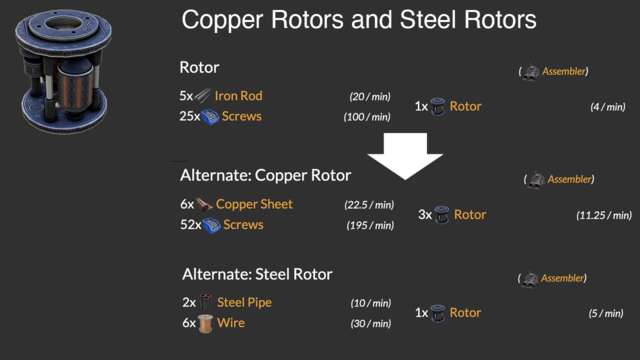
The Copper Rotor is the real star here, offering almost triple the output for fewer resources, but the Steel Rotor works too, giving you a slight output bump.
Encased Industrial Pipe

These are actually slower to produce than Encased Industrial Beams, but switching out Steel Beams for Steel Pipes means a 20+ percent reduction in steel Ingots needed, making this an overall win.
Fine & Rubber Concrete

Concrete is one of the first things you’ll find in Satisfactory, and it’ll be one of the last things you use whether you play for ten hours or a thousand. Fine Concrete adds a bit of silica to the mix, while Rubber Concrete does the same, but with Rubber. The standard output for Concrete is 15 per minute, but these recipes raise it to 50 and 90 Concrete per minute, respectively–three or six times the output.
Heavy Encased & Flexible Frames

Heavy Modular Frames are a mid-game item, and this alternate recipe is a great option if you manage to find it, offering a significant drop in resources needed along with a 40% output bump.